
Как скопировать доску в trello и вставить в другую доску
Обновлено: 02.05.2024
Since its creation, Trello's standard organizational structure for boards has been a Trello Team ( What are teams?). Trello Teams act as a container for multiple boards that typically fit within a similar theme. They also provide a way to give multiple people access to multiple boards, without having to invite them to each board individually.
The name “Team” gives an expectation that it must be used with a group of people. Contrary to popular belief, Trello Teams can consist of a single person and contain boards that are not shared with anyone. To help remove this expectation, the name Team is being changed to Workspace.
With this new terminology, we are requiring that all boards must exist within a Workspace. We will prompt users to migrate any boards not currently in a Workspace with the provided Migration Wizard. The Wizard will guide users to move their personal boards into existing or newly created Workspace(s). However, all users can choose to move personal boards into Workspaces without the Wizard, or let Trello migrate them automatically.
You may notice Team is still shown in some places throughout Trello and our help articles. We are currently in the process of updating the name to Workspace across all Trello resources. Thanks for your patience!

The Workspace Migration Wizard starting page.
The automatic migration dates shown in this article do not reflect the exact dates all users will see. The date will differ depending on when a user is first prompted to migrate their personal boards.
What does this article cover?
Teams to Workspaces
The concept and functionality of a Workspace is the same as a Trello Team, in that it acts as a container for boards, but the new name does not imply a group of people is required or expected for it. A Workspace can be used to contain boards for vacation planning, freelance work, or any other possible usage that only consists of a single user.
It can of course still be used with multiple people as well, for instance, a marketing Workspace, a games night Workspace, etc.
Note that only personal boards will be affected by this change. A personal board is a board that is not currently associated with any Trello Workspace.
How do I know if I have personal boards?
Admin permissions: You must be an admin of a personal board to migrate it to a Workspace. If another user is the admin of a personal board, it would be their responsibility to migrate it.

The personal boards section on the Trello Home page.
If all boards are already in a Workspace(s), there will be no migration required.
There are 3 ways personal boards can be migrated:
- Allowing Trello to migrate boards automatically.
- The Migration Wizard which can be accessed from the banner.
- Manually by moving boards to Workspaces without the Wizard.
Automatic Migration
The Migration Wizard, explained further below, will be recommended for users with a large number of personal boards. If the Wizard is not used before the automatic migration date, the boards will be automatically moved into a Workspace.
Keep in mind that the automatic migration process will not do any of the following:
- Close or delete boards.
- Alter the visibility settings of boards.
- Charge a user for a subscription.
- Give users access to boards they cannot already access.
- Alter the permissions of any existing board members.
If a user has 10 or more personal boards that are automatically migrated, they will be moved into a single Workspace with a free trial of Trello Premium. The trial does not require payment information, so it can be left to expire naturally.
When a Premium Workspace downgrades to a free Workspace (including when a free trial ends), all but the 10 most active boards will be closed. That happens because Free Workspaces are limited to 10 open boards at a time, while a Standard or Premium Workspace can hold an unlimited number of open boards.
If that happens to you, don’t worry! You can still reopen those boards, as long as your Workspace has room for them. You can make room for more boards by re-upgrading your Workspace, closing other boards, or even moving boards to a different Workspace.
Tidying up after Automatic Migration
If personal boards are migrated automatically, a banner will be shown indicating what Workspace the boards were migrated to. Select the green "Make changes" button to review the migrated boards, and if needed, move them to other Workspaces. Otherwise, the banner can be dismissed.

The tidy-up banner is shown after automatic migration.
In the window, the boards that were moved will be displayed, along with a dropdown menu where another Workspace can be selected or created.

Selecting a different Workspace from the dropdown menu.
Select another Workspace from the menu, then select the board(s) that should be moved into the Workspace.

Choosing the boards which will be moved into the selected Workspace.
Once all of the correct boards are checked, select the green "Add" button to move them to the chosen Workspace. These steps can be repeated for as many Workspaces and boards as needed. Once all boards are appropriately placed, select the green "Done" button to close the window.
Using the Workspace Migration Wizard
The Migration Wizard will provide a series of steps to help users migrate personal boards into a Workspace(s) in bulk. It is accessible from the banner shown across the top of Trello. Selecting the green "Start" button will open the Wizard. There are up to four steps required, and each step is shown and explained below.

The Migration Wizard banner on the Trello home page.
Creating a New Workspace
The first step will be to either create a new Workspace or select one that already exists. The default prompt will recommend a new pre-named Workspace, which can be edited, however selecting the text under the default name will allow another to be selected.

The default Workspace and board selection when using the Migration Wizard.
Adding Boards to a Workspace
The next step on the same page is to choose the boards that will be added to the Workspace. By default, all boards will be selected.
If more than 10 personal boards are selected, that will exceed the 10 board limit of free Workspaces, and a free trial of Premium will be recommended on the next page. Alternatively, a selection of only 10 or fewer boards can be selected for the Workspace, then the migration process can be repeated for each additional Workspace.
Each of these options is walked through in the sections further below:

The renamed Workspace and the boards selected for it.
Adding Members to a Workspace
Once the appropriate boards are selected, the next step is to choose which members of those boards to add to the selected Workspace. If the selected personal boards have no other members, this step will automatically be skipped.
There are 3 possible permissions that can be set for the current board members:
- Guests - The default selection. A guest can only access the boards they are already a member of.
- Workspace Member - A member of the Workspace can view any other boards set to Workspace-visible in the next step.
- Workspace Admin - Only available if the Premium trial is chosen for the Workspace. A Workspace admin in Premium will be permitted to access all boards in the Workspace, can change Workspace-level settings, and can add or remove other Workspace members: Team Admin Capabilities.
The Migration Wizard will not automatically add any boards members to the Workspace. By default, they will remain as guests on the board.

Select which members to add to the Workspace in the Migration Wizard.
Changing Board Visibility
After members, the visibility of the selected boards can be changed. A personal board can only be set as Private or Public, but a board in a Workspace can also be set as Workspace-visible.
- Private - The default setting. Private boards are only accessible to the members currently within it.
- Workspace-visible - A Workspace-visible board is accessible to all members of the Workspace.
- Public - A Public board is accessible to anyone with a link to the board and discoverable via a Google search.
This step can also be skipped without any changes by selecting the green "Next" button.

Changing the visibility of selected boards in the Migration Wizard.
Once the board visibility settings are changed or skipped, the new Workspace will be created. A final prompt to visit the Workspace will be shown as the last step in the Wizard.

The final page of the Migration Wizard indicating a successful migration.
Worried you missed a detail? That’s okay, you can visit any Workspace(s) and review its boards, members, settings, etc. To do so, select the Workspace from the Trello Home page, then select the specific details you want to view.
Moving all Personal Boards to one Workspace
When using the Migration Wizard, there are two fundamental paths that can be chosen. The first, and fastest option to complete the migration is to use the default Workspace with all personal boards selected. If there are greater than 10 personal boards selected, a trial of Premium is required to place those boards in a single Workspace.
Michael has 40 personal boards that need to be migrated. He wants to keep all of them within a single Workspace. Using the Wizard and the default selection of boards, he can start a trial of Premium.
After reviewing the members of the boards and the visibility settings of each, he creates the new Premium Workspace on a free trial.
If he wants to keep Premium active, he can add a payment method for the subscription.
Alternatively, the next section below covers the steps to add personal boards to multiple, separate Workspaces: Moving Personal Boards to multiple Workspaces.
Free Workspaces are limited to 10 open boards at a time. A Workspace upgraded to Standard or Premium can have an unlimited number of open boards. If a paid Workspace is downgraded from the trial by its expiring or by the cancellation of the subscription, the Workspace will be considered free. As a result, all but the 10 most active boards will be closed in the Workspace. Closed boards can always be reopened, provided there is room in the Workspace.

Selecting a free trial in the Migration Wizard.
To continue with the trial, select "Next" then follow the steps to add members to the Workspace and change any board visibility settings as well. The sections above cover those two steps in more detail. Once finished with the migration, you will be sent to your new Premium Workspace.

A newly created Workspace on a free trial of Premium
Moving Personal Boards to multiple Workspaces
The second route that can be taken with the Migration Wizard is not as fast as creating a single Workspace with a Premium trial ( Moving all Personal Boards to one Workspace), however, it will result in a more granular control of adding boards to different Workspaces.
Pam is a freelance artist, and she uses a single Trello account for her work and for personal home projects. She has 3 personal boards for artwork and 4 for work around the house.
Using the wizard, Pam can create a new Workspace, named something like “My Art Boards” and then move all 3 related boards into it.
Once those boards are moved into the new Workspace, she can repeat the process with the Wizard and create a new Workspace for home related projects. This Workspace could be named, “House Projects”.
She moves the 4 remaining personal boards into the Workspace, and Pam is finished with the migration.
Instead of using the default Workspace in the Wizard, other existing Workspaces can be chosen. Alternatively, new Workspaces can be created from the Wizard as well. To do so, select the relative text under the Workspace name.

Selecting a different Workspace to move boards into via the Migration Wizard.
This will change the Wizard slightly and allow for multiple Workspaces to be switched between, and multiple boards can be selected and moved into each respective Workspace. Select the dropdown to see any existing Workspaces, or to create a new one.

Selecting a Workspace from the dropdown menu.
After selecting a Workspace, check the boards that should be moved into it. Once all the correct boards are checked, select the green "Add" button to move the boards to the Workspace. The boards will be removed from the Wizard, leaving only the boards that still need to be migrated.

Checking boards that should be moved into the selected Workspace.
Repeat the steps for each selection of boards that belong in a specific Workspace until all boards are migrated. Once completed, the green "Done" button will be available and the migration is finished.
Manual Migration of Boards
Using the Migration Wizard is not required. Workspaces can be created in Trello as normal, then boards can be individually moved into them.
Jim has 16 boards but he isn’t sure where each should belong. He knows some boards are for work related purposes, and others are for his own personal use.
Instead of using the Wizard, he creates a new Workspace manually, named something like “My Work Boards”. He can also create another Workspace named, “My Personal Boards”.
Jim can then go to each board to check its contents and confirm what it is related to. If the board is work related, he can move it into the “My Work Boards” Workspace.
If the board has personal content, he can move it into the “My Personal Boards” Workspace. He can repeat those steps for every board until all are properly categorized.
Frequently Asked Questions
Migration Wizard
What if I don't see the banner?
If you don't see a banner, you either have no personal boards, or your account has not been prompted to migrate yet. You can check if you have personal boards in the instructions above: Teams to Workspaces.
Can I migrate boards or use the Wizard on the mobile apps?
Manually moving boards between Workspaces is possible on the mobile apps, but the migration Wizard will only be accessible on the web and desktop versions of Trello.
Can I migrate my personal boards before seeing a banner?
Yes! Personal boards can be moved into a Workspace at any point. Waiting for a banner or message to migrate is not required.
General
Free Workspaces have a 10 board limit - Does this mean I no longer have unlimited boards for free?
No, all Trello users still have the ability to create an unlimited number of boards for free. However, an additional free Workspace will need to be created for every 10 boards.
What is the difference between Teams and Workspaces?
The only difference is the name. There is no difference in the functionality of a Team versus a Workspace.
I don't want/need a Workspace. Can I opt-out of this change and still create personal boards?
No, it is not possible to opt out. All boards must be in a Workspace.
There are some personal boards that I cannot move. Why not?
You will only be asked to migrate personal boards you are an admin of.
There are multiple admins on a personal board. Who should migrate the board?
If multiple board admins are present, they will all be prompted to migrate the board. The first admin to do so would complete the process for everyone. Note that doing so would not revoke other board admins' permissions.

Такая ситуация. Я пользуюсь Trello для управления задачами (удобная штука - но это тема для отдельного разговора).
Если вы пользуетесь, то знаете, что задачи там помещаются на т.н. доски (boards).
До недавнего времени как доски с серьезными задачами, связанными с предпринимательской деятельностью и т.п., так сугубо личными (типа "купить батон" :) ) я создавал в своем профиле.
Спустя какое-то время я создал еще один профиль в Трелло именно для задач личных. Однако в первом профиле остались несколько досок с такими же личными задачами. Само собой разумеется, что мне захотелось перенести доски с личными задачами из профиля А в профиль Б.
Но как это сделать?
Вы наверное знаете, что у доски в Трелло может быть не один администратор (admin), и также не один участник (member).
Самый простой способ - это добавить профиль Б в качестве участника в соответствующей доске Трелло.
Но мне хочется именно, чтобы доски личного характера вообще исчезли из списка моих досок в профиле А, и появились в профиле Б, где бы я имел полные права на действия с ними.
- Откройте доску в профиле А, которую вы хотите переместить в профиль Б.
- В правой боковой панели управления, нажмите Add Members. (Если панель скрыта, откройте ее.)


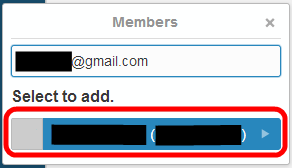
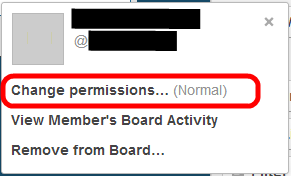

- В боковой панели, кликните на пиктограмме пользователя, у которого вы хотите забрать права админа (профиль А).
- Выберите пункт Change permissions.
- В появившемся окошке выберите Normal. (Было: Admin)


Вариант с организацией я не рассматриваю, потому что не пользуюсь организациями в Трелло. Но предполагаю, что процесс будет похож.
You can copy pretty much anything in Trello, making it really useful to re-use existing cards, checklists, lists, and boards.
Cards
Open a card and select Copy from the right sidebar under Actions. After clicking copy, you can name the copied card, choose what you want to keep when it's copied and where you would like to copy the card to.

Copy a card: pick what to keep and where it goes.
You can also copy a card by right clicking the card from board view.

Lists
Copying a list will copy all of the cards on that list into a new list, including the checklists, attachments, and comments from the original cards. To copy a list, click the context menu in the top right of the list and choose Copy list. When a list is copied, we'll copy card descriptions, attachments, and comments. We won't copy card history/activity (like when a card was moved between lists).

Copy a list and all of its cards.
Boards
You can even copy entire boards! Open the board's menu, then click More and choose Copy board. When a board is copied, we'll copy cards and their descriptions. We don't copy comments or card activity, however. If you want a "full copy" of the board, the best bet is to copy each list individually and move it to your new board. You might also check to see if you want to change the board admins, or move the board to a new Workspace, instead.

Copy an entire board.
Bonus! Checklists on cards
You can also copy just the checklists on cards. When you go to add a checklist, there's an option to Copy items from which will let you copy any other checklist on your board.
Я бы хотел перенести доску в другую организацию, но похоже, что организацию нельзя изменить после ее установки.
Можно ли вообще так перемещать доски?
Хотя это было невозможно в ранней версии Trello, теперь вы можете сменить команду, в которой находится доска.
- Идти к доске
- (Справа нажмите «Показать меню», если оно еще не открыто)
- Нажмите «Подробнее . »
- Нажмите «Настройки»
- Нажмите «Изменить команду»
- Выберите из списка

Похоже, это изменилось.
- На доске покажите боковую панель, если она еще не открыта, нажав Показать боковую панель или нажав w
- Нажмите на Меню и раскройте его, если необходимо.
- Нажмите Дополнительные настройки .
- Затем нажмите « Изменить организацию» и выберите свою организацию, как указано выше.
@VebjornLjosa Я использовал «Дополнительные настройки» сегодня. Возможно, вы не администратор форума, который вы просматривали.
Теперь вы выполните шаг 1., затем выберите . Далее , затем Настройки и прибыль. Смена организации находится там - по крайней мере, прямо сейчас.
- Нажмите «Меню форума»
- Нажмите «Профиль»
- В разделе «Организация» нажмите ссылку «Изменить»

Примечание . Вам нужно будет иметь правление, которое вы изменяете, и вы должны быть членом организации, в которую вы переносите правление.
Изменение организации, к которой принадлежит совет

Вы можете изменить организацию, которой принадлежит доска, открыв правую боковую панель на доске, нажав «Меню», затем «Дополнительные настройки», а затем «Изменить организацию». В раскрывающемся меню выберите организацию, к которой вы хотите, чтобы ваша доска объявлений принадлежала, или выберите «нет», если вы не хотите, чтобы ваша доска объявлений принадлежала организации.
ПРИМЕЧАНИЕ: вы должны быть администратором совета, чтобы изменить его организацию.

Измените организацию, к которой принадлежит доска, из настроек доски. Вы также можете изменить организацию, с которой связана доска, щелкнув название организации в заголовке вашей доски справа от названия вашей доски, выбрав «Изменить организацию», а затем выбрав организацию, с которой вы хотите связать свою доску.
Или измените организацию, к которой принадлежит совет, из заголовка.
По состоянию на июль 2019 г. один из простых подходов - просто поделиться доской с новой учетной записью пользователя Trello, а затем удалить (в зависимости от вашего варианта использования вы также можете «покинуть» доску, если вы не являетесь владельцем доски), доска со старого аккаунта.
Это мой взгляд на синтетический эквивалент «Переместить доски Trello между организациями» в соответствии с вопросом OP.
Например, когда функция становится сагой, и поэтому карта генерирует свою собственную «доску» (возможно, в другой организации - если функция «передается на аутсорсинг»), так что на ней появляются более мелкие компоненты функции.
Примечание. Этот ответ был обновлен в связи с изменениями в Trello. Устаревшая информация все еще доступна в конце.
Вы можете ссылаться на другие карты на любой доске. Просто вставьте ссылку на карту в текст .

и Trello преобразует его в симпатичную ссылку со значком и названием карты.

См. Поддержку Trello для объяснения устаревания функции: перемещение между платами изменяет номер карты.
Например, у вас может быть что-то вроде этого в описании карты:
Обратите внимание, что ссылка на карту работает только на одной плате, она не является межплатной
Когда старое поведение изменилось, я отправил отчет об ошибке в Trello и получил это обратно:
То, что вы обнаружили, на самом деле является ожидаемым поведением на данный момент. Недавно мы отказались от функциональности связывания номеров в Trello, и на данный момент, к сожалению, такой функции нет. Прямо сейчас лучше всего использовать полную ссылку на карту.
Мы определенно понимаем, что это расстраивает. Я сожалею, что мы удалили часть Trello, которая была важна для вашего использования продукта. К сожалению, были некоторые проблемы со ссылками, и они не будут работать должным образом, когда карты будут перемещены на другие доски. Точно так же наше мобильное приложение будет показывать только число и фактически не будет создавать кликабельную ссылку.
Лучшее, что я могу сказать, это то, что мы работаем над тем, чтобы изменить то, как мы добавляем вещи в Trello, чтобы нам не пришлось удалять функции в будущем.
Читайте также: